Welcome to Intro to CSS!
CSS stands for Cascading Style Sheets. It is a language that allows us to add styles to HTML documents on the web— it’s incredibly powerful!
Warm-Up: Imagine you’re designing a room. You can choose any colors, furniture, lighting, or decorations. How would you make it your own?
🤖 AI Connection
Use an AI image-generator like Gemini (Nano Banana) to create a visual representation of how you would decorate your room!
CSS is like decorating a webpage! It lets you choose colors, fonts, layouts, and more to make a site uniquely yours.
Try-it | Explore: CSS Zen Garden
Let’s check out CSS Zen Garden, a website that features different CSS designs. As you explore the site, click on several design options and observe both the content and the design. What do you notice?
You’ll learn that there is so much that CSS can do, and there are so many specific ways we can give directions, in code, to style our webpages. Today, we’ll talk about most of the commonly-used things that CSS can do. By the middle of the week, you’ll have most of the CSS tools you’ll need to build a beautiful site!
CSS Syntax
In CSS, we write a set of rules for how our document should look. The browser evaluates those rules and styles the page accordingly. A CSS rule is defined as follows:
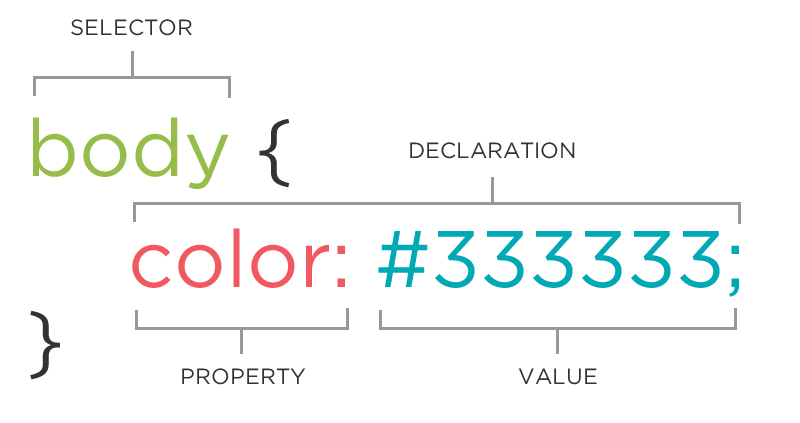
In the example above, the browser will set the color of any text element inside the
<body> element. We can define multiple sets of properties and values in a given rule.In the previous section, we said that “there is so much that CSS can do.” Each little thing it does comes from a property. One example is
color - a property can help us change the color of text. You’ll notice that CSS properties that expect a color value (such as color, background-color, or border-color) accepts one of several standard formats.- In the image above, the value for the color property is defined using a hex code. This hex code allows you to have precise control over the color! To define a color value using a hex code, use a hash (#) followed by six hexadecimal characters (0-9, A-F) that represent the intensity of Red, Green, and Blue (e.g., #FF5733).
- You can also use standard English keywords to set a color quickly, such as
blue,violet, or evenpapayawhip! There are 140 named CSS colors supported by modern browsers. You can check out all 140 here!
Text
While we may take it for granted, the decisions that a developer makes for a webpage’s text has a huge influence on the experience a user has! Here are some things to notice about any piece of text:
- Font
- Size
- Weight
- Color
Using CSS, we can control all of that! If you visit Khan Academy on a laptop, you’ll see a menu on the top. Each link that a user can click on has the following CSS rules applied to it. All of these lines of code are there solely to control the look and feel of those links!
p {
	font-family: lato;
	font-size: 16px;
	color: #1865F2;
}
Let’s break down the code above, using our new vocabulary!
- The entire code snippet is referred to as a CSS rule
- The selector is
p- that’s the element which will be changed with this rule
- Each line inside the curly braces is a declaration
font-family,font-size, andcolorare the four properties that are being assigned values in this rule.
'lato',16px, and#1865F2are the four values assigned to their respective properties
- The colons
:and semi-colons;are necessary!
By now you’ve probably realized that there are many, many properties that we could use! There are some that you will use frequently and quickly memorize. However, you do not need to remember the entire list; there are resources like HTML Dog or CSS-Tricks, which you can reference anytime you are coding!
Try-It | Style Text
We'll be working in CodeSandbox again, but now we will use both the HTML and CSS files. Open this CodeSandbox template, fork your own copy by clicking
We'll be working in CodeSandbox again, but now we will use both the HTML and CSS files. Open this CodeSandbox template, fork your own copy by clicking
Fork in the upper-right corner, and take note of the existing HTML elements to get started. Then, follow these steps:- Write a CSS rule for the
h1. Inside the rule, write a declaration to change thefont-sizeandcolorof yourh1. Find a list of colors to use here.
- The images on this site are a little too big! Write a CSS rule to modify the size of all the
imgelements by modifying thewidthorheightproperties.
- Write a CSS rule for the
h2elements. Use the links below to explore other CSS properties:
- Use the
bodyselector to modify thefont-familyproperty for the entire webpage. If there are other changes you want to apply to the entire page, move those declarations to this CSS rule now!
🤖 AI Connection
Open an AI tool (like ChatGPT, Gemini, or Claude) and ask for recommendations of CSS colors or Google fonts to match the intended vibe of your site. Do you agree with the suggestions?
Click here for a Mild Challenge 🌶
Do some google research on how to use hexadecimal codes instead of color names. For example, the hexadecimal code for white is
#ffffff. See if you can implement these in your code!Click here for a Medium Challenge 🌶 🌶
Google Fonts has hundreds of free and fun fonts you can easily add to your site! Check out this how-to guide, then add some fun fonts to your project!
Wait, how do the HTML and CSS files talk to each other? Take a look at your
index.html file, in the <head> element, you'll see a line like this (and if not, write one in!):<link rel="stylesheet" href="styles.css" />
This
<link> tag is what connects your HTML to your CSS file. Without it, the browser wouldn’t know which styles to apply, and your page would just look plain. And here's a sneak peek: later on, we'll use a similar method to hook up JavaScript to your HTML. For now, make sure that this connection is in place so you can see the styling changes in action!Styling the Navigation Bar
Our navigation bar still looks like a list of links. It’s time to use CSS to transform it from a basic list into a modern, horizontal menu!
Think About It: What needs to change on our navigation bar to make it a modern horizontal nav bar?
To style a nav bar effectively, we must first understand the hierarchy of our elements. Our navigation bar uses a nested structure:
<nav>
	<ul>
		<li><a href="index.html">Home</a></li>
		<li><a href="timeline.html">Timeline</a></li>
		<li><a href="resources.html">Resources</a></li>
	</ul>
</nav>
If we simply styled every
<ul> on our page, we might accidentally change the look of other lists in our main content. To style only the navigation bar, we use Descendant Selectors. By putting a space between element names—like nav ul—we tell the computer: “Look inside the <nav>, and find the <ul> items.” This ensures our styles are applied specifically to the unordered lists in the navigation area.nav ul { /* styles for only the unordered list in the nav! */ }
By default, browsers add bullet points and extra spacing (padding/margin) to unordered lists. We need to clear these out to create a clean bar. We also want to add a background color so the bar is visible.
list-style: Setting this tononeremoves the bullet points
background-color: Adds a base color to the bar
marginandpadding: Setting these to0removes the default browser "shove"
nav ul {
  list-style: none;
  background-color: plum;
  margin: 0;
  padding: 0;
}
Even after styling the
nav, you may notice a small white gap between the bar and the top or sides of the browser window. This is because the <body> element has a default margin. To make your nav bar perfectly flush with the screen, you must reset margin on the body:body { margin: 0; }
Next, we need to address the default appearance of links (blue and underlined). We use the descendant selector
nav a to target only the links inside our navigation bar.text-decoration: Setting this tononeremoves the underline
color: Allows you to choose a professional color that stands out against your background
nav a {
  text-decoration: none;
  color: indigo;
}
Finally, the most important step in creating a nav bar is moving the links from a vertical stack to a horizontal row! By default,
<li> elements are block-level elements, meaning they take up the full width of the page. By changing the display property to inline-block, we allow the items to sit side-by-side like words in a sentence.nav li { display: inline-block; }
Try-It | Update Your Navigation
- Set
nav ultolist-style: none, update the background color and remove default margin and padding.
- Reset the
bodymarginto0, removing the white border around the page.
- Set
nav atotext-decoration: noneand update the font color.
- Set
nav litodisplay: inline-block.
- Play around with margin and padding to achieve the look you want for your nav bar!
Click here for a Mild Challenge 🌶
Professional nav bars change when you touch them! Research how to use the
:hover pseudo-class to make the font color change when the user hovers over a link.🤖 Try using this detailed prompt with an AI tool to help you!
I am building a website and I have a navigation bar with the structure nav > ul > li > a. Can you show me the CSS code to make the font color of the anchor tag change when a user hovers over it? Please explain what the :hover part of the selector does.
Classes & IDs
Imagine you're the director of a big school play, and you have to tell the actors where to stand and what costumes to wear. You could give instructions to everyone (like all the actors), or you might need to give a special instructions to a smaller group (like only the extras), or even to just one person (like the lead actor). In CSS, classes and IDs work in a similar way to organize and style elements on a webpage.
Right now, we know how to style all of the
h2 elements or all of the images on a page. But what if we only wanted to style a particular one? Classes and IDs will help us do that!- Classes style specific groups of elements (like the extras)
- IDs style a single element (like the lead actor)
Classes
In the previous lesson, we learned that an
img tag has a src attribute. An attribute is an extra piece of information we can choose to attach to any HTML element. One common and handy attribute is class. The class attribute allows us to group elements together, regardless of their tag type.<div class="bio-card"> <h2 class="name">Dr. Aprille Ericsson</h2> <p>Dr. Aprille Ericsson is an aerospace engineer...</p> </div> <div class="bio-card"> <h2 class="name">Radia Perlman</h2> <p>Radia Perlman is a computer scientist...</p> </div>
A few things to note about
class attributes:- You decide the class name that is inside the quotes, but it’s helpful if it’s descriptive!
- They can be used on ANY type of element
- An element can have more than one class:
class="bio-card highlight”
- Class names follow a standard convention: all lowercase with a dash
-if it’s more than one word
Check out the example CSS rules below targeting the
bio-card class and the name class. Notice the syntax! When we targeted all paragraph elements, we used the selector p without any additional punctuation. Since we are targeting a class, we have to use a . before the class name to tell the browser to look for HTML elements with that class assigned to them..bio-card { text-align: center; } .name { text-transform: uppercase; }
In this example, the CSS rules for the
bio-card class will be applied to the elements with that class, but no other elements! Similarly, the CSS rules for the name class will only be applied to elements with that class. In our example HTML above, this means only the <h2> elements with the name class will appear in uppercase. Any other <h2> elements won’t be affected by this CSS rule.IDs
An ID is a label for one specific element. It’s like the instructions you might give to only the lead actor in your play. It’s unique—no two elements should have the same ID. For instance, what if we wanted to center the title on the home page, but we don’t want to center all of the titles? We could assign the home page title a unique ID attribute.
<h1 id="home-title">Inspiring Women in STEM</h1>
Similar to classes, the CSS selector includes a
# before the id name to tell the browser to look for elements with the home-title id.#home-title { text-align: center; }
This makes the
<h1> with the ID #home-title centered on the Home page, but doesn’t change the other <h1> elements.Try-It | Classes & IDs
Continue working with the previous CodeSandbox template.
- Add the
bio-cardclass to all of the<div>elements that wrap information about a specific person inindex.html.
- Define the styles for the
bio-cardclass instyles.css. Give each card: - A
borderto make it stand out (Learn more about borders here!) - Some
paddingto give the text some breathing room - A
border-radiusto round the corners
Click here for a Mild Challenge 🌶
Find one scientist on your list who is your personal favorite. Give that specific
<div> a unique ID (like id="featured-scientist"). In your CSS, use the # selector to give that one card a special border color or a subtle background glow!Key Differences Between Classes and IDs
- Classes are reusable. You can use the same class for as many elements as you like. Think of it as a uniform for a group.
- IDs are unique. You use an ID for one special element only.
By using classes and IDs, you can efficiently style your webpage, keeping it well-organized and without repeating a lot of code. Remember how we compared writing classes and IDs to being a director of a big school play? Think of writing classes and IDs like assigning costumes and props to groups of actors (classes) and giving unique stage directions to the lead roles (IDs). This allows you to create a polished and visually stunning performance—your webpage masterpiece!
Think About It
In just your first lesson of learning about CSS, you’ve already learned so much! Take a minute to write down your key takeaways from this lesson.
- Things that seem the newest to you
- Things that seem most interesting to you
- Questions that are still on your mind
Commenting
In CSS, comments work exactly like they do in HTML—they are your "invisible" notes to help keep your stylesheets organized. Whether you're labeling sections of your code or temporarily "turning off" a style to see how the page looks without it, the browser will skip right over them. Here are a few good reasons to use comments in your CSS code:
- Organize your styles: Use them to label sections (e.g.,
/* Navigation Styles */).
- Debug your design: Comment out a specific property like
background-colorto see if it's causing a visual bug.
- Leave reminders: Note why a specific "hack" or complex value was used for future reference.
/* This is a CSS comment */
Good news! You can use the exact same keyboard shortcut you learned for HTML to comment out code in CSS! Just highlight the lines you want to hide and hit
Cmd + / for Mac or Ctrl + / for PCs.Practice
For each practice prompt, continue building on your inspiring person page from our HTML: Syntax lesson by adding your own CSS! The sky’s the limit here so feel free to add whatever syntax you’d like. Feel free to toggle below for some guidelines if you need inspiration!
For each practice prompt, continue building on your inspiring person page from our HTML: Syntax lesson by adding your own CSS! The sky’s the limit here so feel free to add whatever syntax you’d like. Feel free to toggle below for some guidelines if you need inspiration!
Click here for Mild Practice 🌶
Customize your site with a unique color palette using Color Supply or Coolors.
Hint: Use hex codes (
#ffffff) instead of color names (white) for the values.Click here for Medium Practice 🌶🌶
To enhance the appearance of the sections, you could:
- Add a
background-colorto each person’s section.
- Modify the
marginproperty to add space around the sections.
🤖 Toggle here to learn how to use AI prompting if you need help!
Remember that using AI is about guiding yourself to learn! Here’s an example of what you could prompt:
I'm working on a webpage that displays a list of inspiring people. I want to improve the visual design by:
- Adding a background color to each person's section
- Creating some space between the sections
I'm still learning CSS and want to understand how to approach this. Can you help me think through which CSS properties I should use and how I might structure the code?
Click here for Spicy Practice 🌶🌶🌶
Add another inspiring person to your site. Check out some of the folks on this list for some inspiration! After adding a new person, use an ID to make this person stand out.
Click here for Extra Spicy Practice 🌶🌶🌶🌶
Please note that Spicy Challenges really are spicy! Often they require you to use outside of those already provided to you.
Add interactivity with hover states.
- When a user hovers over any person’s section, change its background color slightly.
- When a user hovers over the person’s name, add an underline to the text.
Hint: Use the
:hover pseudo-class.🤖 Toggle here to learn how to use AI prompting if you need help!
Remember that using AI is about guiding yourself to learn! Here’s an example of what you could prompt:
I'm trying to improve my webpage using CSS. I want to create some hover effects, but I’m still figuring out how they work. Specifically:
- When someone hovers over a person’s section, I want the background color to change a little.
- When someone hovers just over the person’s name, I’d like the text to get an underline.
Can you help me understand what selectors or CSS rules I should look into to make this happen?
For a summary of this lesson, check out the 3. CSS Syntax One-Pager!