Welcome to your first technical lesson! Today, you'll be learning your first language: HTML. Of all of the major technologies used on the web, on the front- or the back-end, HTML is the oldest. In the beginning, the web was just a bunch of HTML documents. They had these cool things called hyperlinks that would allow a user to click on a word on one page and be taken to another page. Every webpage you have visited was built with HTML!
🎯 Learning Goals
Understand what HTML stands for and its purpose
Recognize and use common HTML elements
Identify and use attributes on HTML elements
📗 Technical Vocabulary
Attribute
HTML
HTML Element
HTML Tag
Nesting
Container Element
🌤️
Warm-Up
Look how we added a custom message to Gracie Abram’s X feed! Want to know how we did this? Let’s look at the html code that controls the content of a webpage and add in some custom text of our own!
Right-click on any part of the page and select “Inspect”
When the DevTools pane opens, click the top-left arrow icon and move your cursor to the “25 years of the free encyclopedia” text on the page
Double click on the text in DevTools and change it to anything you want
See the change reflected on your screen!
That was fun, right?! But what happens if you hit the refresh button on the page? The changes are gone! That’s because you only changed the browser’s temporary view of the page, not the actual source code. What you saw in the DevTools pane was HTML (HyperText Markup Language), the code that tells the browser what content to display and how to organize it!
💻 Coding Environment: CodeSandbox
In order to write your own HTML, you’ll need a dedicated workspace where you can save and edit your files. CodeSandbox is where we will write code to learn, experiment, and build our understanding of three web technologies: HTML, CSS, and JavaScript. Start by creating a CodeSandbox account, making sure to use an email you currently have access to. If you’ve used CodeSandbox before, feel free to log in to your previous account.
Create a CodeSandbox Account
To create a CodeSandbox account, you’ll want to click Sign In (yes, it’s not “Sign Up” like other sites). You can sign up using your Google account. If you don’t have a Google account, you can use “Sign in with GitHub”, where you’ll have to create a new GitHub account.
Select a username.
This will be part of your CodeSandbox URL: codesandbox.io/u/[username]
Usernames must be unique and can't contain spaces
We’d recommend making it somewhat professional, as you may be sending it to others
In the "Display Name" field, we recommend using your first name and last initial.
Example: "Sophie K." or "Miguel R."
This is the name that will appear on your projects and comments
Select “Student” as your role.
Select “Education” as how you’ll plan to use CodeSandbox.
Name your workspace KWK-WebDev-2026.
📸 Click here to see a screenshot of this step!
If CodeSandbox asks “How would you like to use CodeSandbox?”, just click the Next button!
📸 Click here to see a screenshot of this step!
Finally, choose the free version of CodeSandbox! You don’t need more than that.
📸 Click here to see a screenshot of this step!
Create a New Sandbox
Once you’ve created your account, you can click the yellow + Createbutton to create a Sandbox.
Select the HTML + CSS template and create a descriptive title like html-syntax
Change the visibility to Unlisted (everyone with the link can view)
Keep the other settings the same
Click the yellow Create Sandbox button!
Let’s explore the various areas of a workspace in CodeSandbox. The activity bar holds all the tools for managing your developer experience. We’ll spend most of our time with the Explorer, which has your files. We will only be working in the index.html file for now! In the middle of the screen is the code editor. This is where you will write your code.
On the right-hand side, you’ll see the Preview. This is the output of your website! You can even click on these two rectangles to open your website in a new tab with its own custom URL!
Now that you know the basics of the IDE we’ll be using, let’s get learning about HTML Syntax! ⬇️
The Structure of an HTML Page
Before we write specific tags, we need to understand the boilerplate of an HTML file. The boilerplate is what we call the standard chunks of code that must be included in a file for it to work correctly! An HTML file is split into two main parts: the head and the body. Only the tags within the body will appear in the preview! When you open your index.html file, you will see this structure:
<!DOCTYPE html>: Tells the browser "This is an HTML document."
<html>: The root container for everything.
<head>: Contains settings, the page title (in the browser tab), and links to stylesheets.
<body>: Contains the images, text, and buttons your users will actually see.
💡
Did You Know? Remember, if you want it to appear on the webpage, it must go inside the <body> tags!
✏️
Try-It | CodeSandbox
Locate the index.html and styles.css files. Click back and forth between them once to see how the coding editor changes. Select the index.html file to open it in the editor. The .html file extension means we’re working in an HTML document. We will only edit this file during this lesson!
Replace the text “This is a simple HTML + CSS template” with “Hello World” and then press this refresh button to update the Preview.
Above the browser preview on the right, click the “Open in a new tab” button and click it to open your webpage in a full browser tab.
HTML Syntax & Nesting
HTML is made up of two things: text and tags that mark up that text. (HTML stands for hypertext markup language!)
Let’s say that we had some text, and we wanted to communicate that this text was a paragraph.
This text is a paragraph.
In our HTML code, we’d wrap the text in paragraph tags. The code would look like this:
<p>This text is a paragraph.</p>
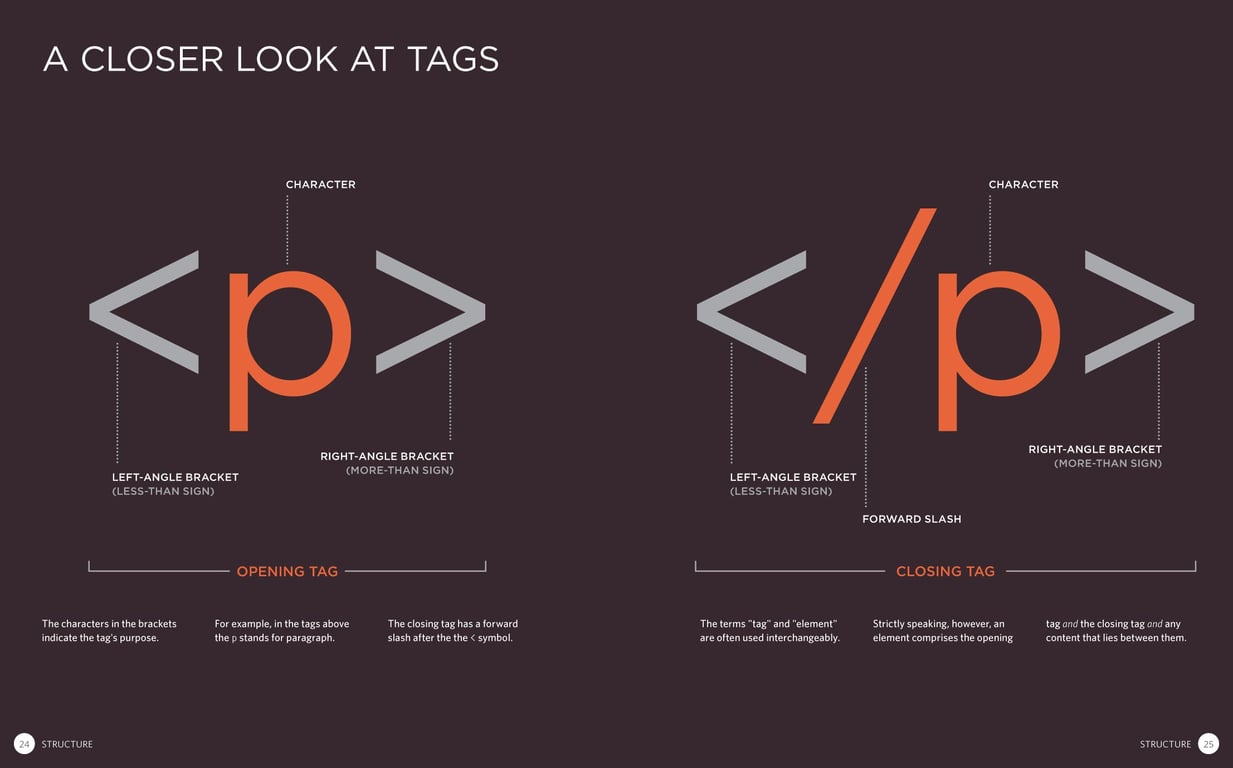
You’ll notice that there are tags on both ends of the text. The entire code block above, the tags and text inside, make up an HTML Element.
We use <p> (the opening tag) to tell the browser that everything that’s about to follow is part of a paragraph and </p> (the closing tag) to tell the browser that this paragraph is complete. The p stands for paragraph in this case. We can’t make up tags! We must use the specific tags HTML provides.
Essential Tags
The first two tags to learn are headings and paragraphs. You’ll use them on almost every website to organize text!
Headings (<h1> to <h6>): Just like a newspaper or textbook, websites use headings to organize content. Ranging from <h1> to <h6>, these tags create a hierarchy of importance with <h1> being the most important. As you move down to <h2>, <h3>, and so on, these represent section headings and sub-sections getting smaller and less important.
Paragraphs (<p>): This is the standard tag for blocks of text or the main body of your content. If you are writing a sentence or a description, wrap it in a <p> tag.
Nesting
In most HTML documents, we will see nesting. This means that one (or more) elements will live inside of another element. We often use the terms nest and wrap to describe this process. Think of it like a set of boxes. You have a big outer box, and inside that, you have smaller inner boxes.
Parent: The outer element
Child: The inner element nested inside.
The best way to understand nesting is to look at a list! A list is not just one tag; it is a group of tags working together.
Unordered list (<ul>): This creates the outer box (the parent) for the bullet points.
List items (<li>): These are the actual bullet points (the children) living inside the parent.
👆 Notice how the <li> tags sits neatly inside the opening and closing <ul> tags. Nesting not only organizes your content but also makes your HTML easier to read.
✏️
Try-It | HTML Syntax
Choose a topic for your website! Change the main title (<h1>) to match the topic you chose.
Write a short paragraph (<p>) about your topic.
🤖 AI Connection
Don't let writer's block slow down your coding! In the real world, developers often use AI tools to quickly generate "placeholder" content. This allows them to focus on building the structure of the website without worrying about writing perfect paragraphs.
The Prompt: Open an AI tool (like ChatGPT, Gemini, or Claude) and paste this prompt: "I am building a website about [TOPIC]. Write a 2-sentence summary of this topic, and provide 3 short, interesting facts about it."
Add a list (<ul>) of 3 facts about your topic.
Remember, to run your code and see the changes in the Preview, press this refresh button or save your changes with Ctrl + S/Cmd + S.
Attributes: Images & Links
Some tags need extra information to work. We call these attributes! Attributes always live inside the opening tag.
Images (<img>): The image tag is special! It is self-closing, meaning it has no closing tag.
<img src="https://www.wework.com/ideas/wp-content/uploads/sites/4/2019/08/EAB8871B-C87A-4768-8BE9-EFD6BA7D48A4.jpg" alt="Our founder, Karlie Kloss hearing from scholars at camp!"/>
The src attribute tells the browser what image to show.
The alt attribute provides alternate text if the image fails to load or for screen readers.
Links (<a>): The anchor tag is used for links on a webpage, has an opening and closing tag, and utilizes attributes!
<a href= "https://www.instagram.com/kodewithklossy/">The Official Kode With Klossy Instagram Account!</a>
This time, instead of src, we use the href (hyper reference) attribute to indicate where the link should go.
The text between the opening and closing <a> tags is the clickable text the user sees!
✏️
Try-It | Images & Links
Copy and paste the following image tag code into your Sandbox after the closing </ul> tag. Does an image of scholars collaborating on code pop into your preview at the bottom of the page? It should!
<img src="https://i.ibb.co/LxGSgpG/AUS-WD1-SARAH-25-1.jpg" alt="Scholars around a computer collaborating on code"/>
Add a link to a site related to your topic using the <a> tag. Place this link anywhere you like on your page. You can even put it within the paragraph!
Update the image to an image of your choice!
Go to Unsplash, Pexels, or Google and find an image you'd like to use.
Right-click the image, then select "Copy Image Address."
In your HTML, use Cmd + V or Ctrl + V to paste the image address into the quotes for your src attribute!
Replace the text for the alt attribute to describe your image.
Is the image showing up way larger than you'd like?We will learn how to control that with CSS soon. For now, you can add this attribute to the <img> tag width="300px".
💡
Did You Know? When using images or content from other websites, citing your sources is important. We want to avoid plagiarism and give credit to the original creator of the content we use. Add a caption or credit below the image with the source link, or include a separate "Sources" or "Credits" page that lists all the sources you used. If the source provides citation guidelines or requirements, be sure to follow them. You can use a simple <p> tag to cite the source below the image or look into using <figure> and <figcaption> for the most professional solution!
🌄 Toggle this to learn how to add your own image on CodeSandbox!
Step 1: Pick an image and upload it to your Sandbox
Select an image or create your own image! You can draw online with sites such as Kleki, or edit pictures with Photopea or Pixlr. Then, create a folder to store your images. In the Files menu, click on the folder icon to add a folder to your project. Note: It is good practice to place any images you upload in an assets folder.
Step 2: Right-click on the assets folder and select Upload.
Locate your image on your computer and click “Open” to upload the picture to your Sandbox.
Double-click on the assets folder and It should look like this when you’re done!
Step 3: Add the image to your HTML Page
Start with an empty <img> tag.
Add a src attribute to the image tag.
Within the quotation marks "" for the src attribute, add the image address: <img src="/assets/pasta_tree.jpg">
👉 If the image isn’t working, the most common fix is that you’ll have to add a forward slash (/) before the path!
Creating a Multi-Page Site
Real websites are rarely just one single page! They usually have an “About” page, a “Contact” page, or even a “Shop” page. Look at the navigation bar at the top left of the Roblox site. You see the logo followed by the main navigation links: Charts, Marketplace, Create, and Robux.
You might be surprised to learn that navigation bars like this one are really an unordered list of links inside a <nav> container element! To humans, this looks like a horizontal row of buttons, but to a web browser, it is structurally a list of links to other pages in the site.
Now it’s your turn to expand your website from a single page into a connected network. To make a navigation bar work, we first need destinations for our links to go to. Right now, your project only has index.html, so we need to add new files to your CodeSandbox project. Once those files exist, we can use the structure above to tie them all together into a functioning website.
✏️
Try-It | Navigation
Create 2 new files in your Sandbox with the .html extension. Click the “New File” icon in the Explorer pane and give your pages a descriptive title.
Add the boilerplate HTML code to each file. Try typing an exclamation mark (!) followed by the Tab or Enter key to automatically generate the boilerplate.
Add navigation under the opening <body> tag in the index.html file. Use a <nav> container element and an unordered list (<ul>) with links (<a>) to build the navigation to the other pages. This time, the href attribute should contain the filename of the HTML page you want to navigate to.
Add content to the new HTML pages you created! Include at least a heading (<h1>) and a paragraph (<p>) on each page.
Does your navigation look like a grocery list? Don't panic! Right now, your links are stacked vertically with bullet points because that is the default behavior of an HTML list. This is completely normal. In our upcoming CSS lesson, we will learn how to remove those bullets and align the items horizontally to create a sleek, modern navigation bar. For now, focus on making sure the links work!
Other Common Elements
There are close to 100 elements in HTML! You don’t need to know all of them, but there are a few that you will see in almost every project.
Container Elements
As you build more complex sites, you need to group related content together! Imagine organizing your home: you have different labeled boxes, drawers, or shelves to store various items. In HTML, container elements work much like those storage solutions: they group related items together so you can easily find and manage them. Common container elements include:
<header>: Top of the page (logos, titles)
<nav>: Navigation links
<main>: The primary content of the page
<section>: Groups related content within the main area
<aside>: Related content that stands alone
<footer>: Bottom of the page (copyright, contacts)
<div>: A generic container (used for grouping things for styling)
🫙 Take a look at this blog layout sample code in the toggle. How many container elements can you find?
Along with the HTML elements we’ve covered in the lesson, here are a few more that you will likely see used multiple times in projects:
Ordered list (<ol>): The parent element for a numbered list as opposed to a bulleted list (<ul>)
Division (<div>): A block-level container that takes up the full width of the page
Span (<span>): An inline box often used to style specific words in a paragraph
Button (<button>): Creates a clickable button on your page. Right now, if you click it, nothing happens! That’s because HTML only handles the structure. We’ll use JavaScript in a future lesson to make the button actually do something!
Commenting
In HTML, a comment is a way to leave notes in your code that only you (or other developers) can see. The browser completely ignores these notes, so they never appear on the actual website. Developers use comments to explain complicated code, leave "to-do" reminders for themselves, or temporarily disable a piece of code without deleting it. Check out the syntax for an HTML comment below!
<!--This is a comment-->
You can also use a keyboard shortcut for commenting! Simply highlight the text you want to comment out and then use Cmd + / for Mac or Ctrl + / for PCs.
📝
Practice | HTML: Syntax
Create a new Sandbox project using the HTML + CSS template.
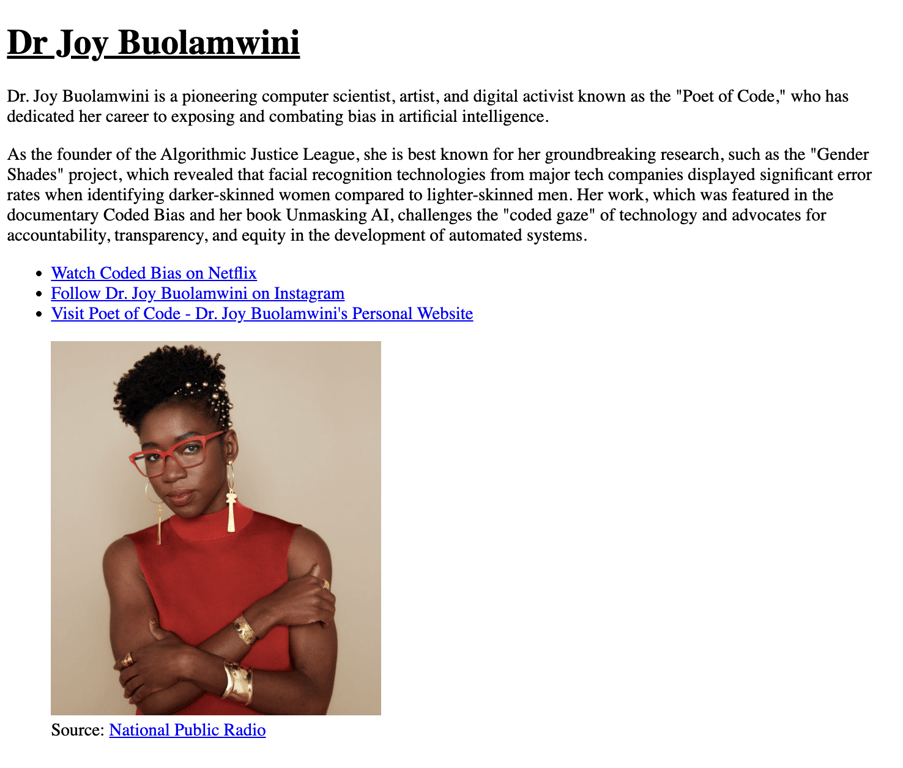
Write an informational bio page like the one below for an inspiring person of your choice! At a minimum, your site should have 6 HTML tags within the <body>, including:
A heading
A paragraph
An image
A link (external or navigation)
🤖 AI Connection
There are many different ways to leverage AI while coding. For example, you might use use AI tools to help you brainstorm ideas, to remind you of syntax, to support with debugging, or to check that your site is accessible to diverse users.
As you work, ask a specific question to an AI tool. Take a screenshot* of the prompt and the tool’s response to share with fellow scholars to better understand the wide variety of ways that this technology can support our learning! *(Screenshot for Windows: Windows Key + Shift + S) (Screenshot for Mac: Command + Shift + 4 )
As a frame of reference, a total of 14 elements were used to create the bio above, and 8 unique elements were used! Can you beat it?
Need some inspiration for who to write about?
Katherine Johnson (NASA mathematician featured in "Hidden Figures")
Dr. Mae Jemison (first Black woman astronaut)
Dr. Gladys West (mathematician whose work led to GPS technology)
Dr. Chien-Shiung Wu (experimental physicist who disproved a law of symmetry)
Grace Hopper (computer scientist who invented the first compiler)
Rosalind Franklin (chemist whose work was crucial to understanding DNA structure)
Dr. Jane Goodall (primatologist and environmental activist)
Rachel Carson (marine biologist whose work launched the environmental movement)
Dr. Fei-Fei Li (AI pioneer and co-director of Stanford's Human-Centered AI Institute)
Megan Smith (former US CTO and founder of shift7)
Sally Ride (first American woman in space)
Sophie Wilson (computer scientist who designed the ARM processor architecture)
CodeSandbox Tips & Tricks
How do I go back to a previous version?
First off, no worries at all. Mistakes are part of the coding process! If you just need to backtrack a few steps, try hitting Ctrl + Z (or Cmd + Z on Mac) in the editor.
Alternatively, if you're planning to make significant changes or simply want to ensure you don't lose anything important, consider saving your current code by dropping snippets into a Slack message to yourself along with a short description. This way, you have a backup and can easily reference your previous work if needed. There are a couple ways to save your code for later in Slack:
For short code, make sure you use the Code or Code block feature:
For longer code, create a Code snippet:
How do I share my CodeSandbox with others?
There are 3 ways to share your Sandbox:
(1) The front-facing link, as in, people can only see your website and not your code
In the Preview panel, copy the link from the top bar.
This will provide a link to your website that is not editable!
(2) The link to the code so that they can “fork” (or make their own) copy
Copy the link to your project from the search bar at the top of your computer window.
From this link, others may preview your project and fork a copy of it to edit, but cannot edit your project files.
(3) The collaborative version, meaning someone can code in your CodeSandbox
Click on the “Share” button in the upper-right-hand corner
Change your permissions to the following:
Convert your Sandbox to a Devbox
Share the url
💡
Did you know?
“Fork” means to make your own copy of a file! The name is used due to its similarity to the act of forking a path, where one path splits into two or more separate paths.